n8n用客製節點,自動執行區塊鏈轉賬

你有沒有想過
存放在區塊鏈上的錢,能夠自動轉出!?
現在用 n8n 就能做到了
那要怎麼做呢?
首先假設這筆錢,不存放在交易所,不然直接用交易所的 API 就好了~
而是持有私鑰的地址,有著一筆錢。
現在私鑰有了。什麼情況要轉帳呢?
最有可能是某個新聞消息。誰又中彈、誰被抓去關等等......
我們可以假設是從 RSS 來的,因為新聞不只一筆,所以要逐筆處理。
然後我們可以透過 AI 去判斷是不是我們指定的相關新聞,例如:哪個政治人物怎樣。
透過 Switch 把相關事件,交給我們今天的主角「客製化的節點」。

製作客製化節點(Node)
要製作客製化節點,首先我們可以去 GitHub 把官方範例下載下來 https://github.com/n8n-io/n8n-nodes-starter
然後放到 n8n 的使用者目錄中。預設是在 ~/n8n,我們在裡面建立 custom/node_modules/
你可以透過下面這指令,完成上述步驟。
cd ~/.n8n
mkdir -p custom/node_modules
git clone https://github.com/n8n-io/n8n-nodes-starter
cd n8n-nodes-starter
npm install
這樣我們就可以開始開發了
我們可以看到,目錄裡有兩個子目錄 credentials, nodes
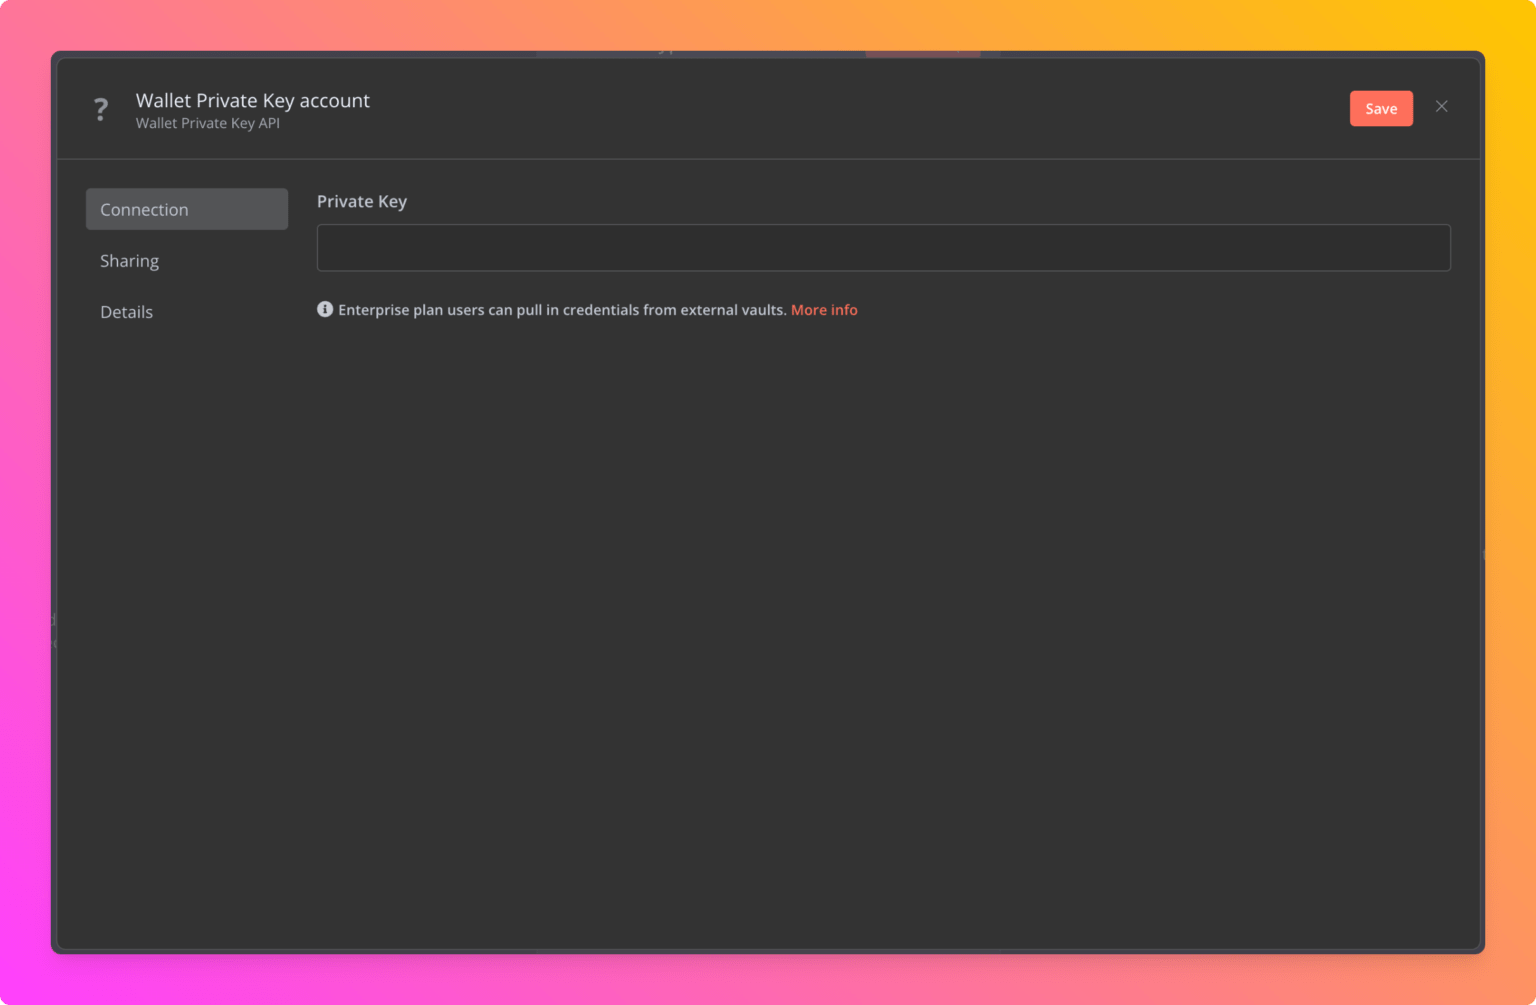
credentials 是用來存放憑證相關資料的,我們就拿來放私鑰
nodes 就是我們所設計的節點囉

我們先來看 credentials
import {

	ICredentialType,

	INodeProperties,

} from 'n8n-workflow';


export class WalletPrivateKeyApi implements ICredentialType {

	name = 'walletPrivateKeyApi';

	displayName = 'Wallet Private Key API';

	properties: INodeProperties[] = [

		{

			displayName: 'Private Key',

			name: 'privateKey',

			type: 'string',

			typeOptions: { password: true },

			default: '',

		},

	];

}
官方範例裡原本就提供 ExampleCredentialsApi.credentials.ts ,我們把它改成我們的 WalletPrivateKeyApi.credentials.ts。
內容非常簡單,只要注意 class 和 name 以及檔名和目錄都要相同(只差在 name 開頭要小寫)
下面 properties 填寫你想存放的資料,這裡就是私鑰。
再來看 Node 怎麼做吧
在這裡我們會用到 ethers 這以太坊的互動的工具。
npm install ethers同樣官方有提供兩個範例,我們把它改成我們要的樣子。
nodes/SendCryptoCoin/SendCryptoCoin.node.ts
import type {
IExecuteFunctions,
INodeExecutionData,
INodeType,
INodeTypeDescription,
} from 'n8n-workflow';
import { ethers } from "ethers";
export class SendCryptoCoin implements INodeType {
description: INodeTypeDescription = {
displayName: 'Send Crypto Coin',
name: 'sendCryptoCoin',
group: ['transform'],
version: 1,
description: 'Send Crypto Coin',
defaults: {
name: 'Send Crypto Coin',
},
inputs: ['main'],
outputs: ['main'],
credentials: [
{
name: 'walletPrivateKeyApi',
required: true,
},
],
properties: [
{
displayName: 'RPC URL',
name: 'rpcUrl',
type: 'string',
default: '',
placeholder: 'http://localhost:8545',
description: 'RPC URL to connect to',
},
{
displayName: 'Chain ID',
name: 'chainId',
type: 'number',
default: 1337,
description: 'Chain ID is the unique identifier for the blockchain network'
},
{
displayName: 'To Address',
name: 'toAddress',
type: 'string',
default: '',
placeholder: '0x',
description: 'To address is the address of the recipient'
},
{
displayName: 'Transfer Amount',
name: 'amount',
type: 'string',
default: '',
placeholder: 'Transfer Amount'
},
],
};
async execute(this: IExecuteFunctions): Promise<INodeExecutionData[][]> {
// 來自前一個節點的資料,我們不會用到
// const items = this.getInputData();
const rpcUrl = this.getNodeParameter('rpcUrl', 0) as string
const chainId = this.getNodeParameter('chainId', 0) as number
const toAddress = this.getNodeParameter('toAddress', 0) as string
const amount = this.getNodeParameter('amount', 0) as number
// 從 credentials 拿取資料
const privateKey = (await this.getCredentials('walletPrivateKeyApi')).privateKey as string
// 連接到以太坊節點
const provider = new ethers.JsonRpcProvider(rpcUrl)
// 用私鑰建立錢包
const wallet = await new ethers.Wallet(privateKey, provider)
// 取得手續費資料
const feeData = await provider.getFeeData()
// 取得 nonce
const nonce = await provider.getTransactionCount(wallet.address, 'latest')
// 建立交易
let tx: ethers.TransactionRequest = {
from: wallet.address,
to: toAddress,
value: amount,
chainId: chainId,
gasLimit: 21000,
maxFeePerGas: feeData.maxFeePerGas,
maxPriorityFeePerGas: feeData.maxPriorityFeePerGas,
nonce: nonce,
}
// 簽署交易
const sendedTx = await wallet.sendTransaction(tx)
// 等待交易被打包,並取得交易完成的資料
const blockOutTxHash = await provider.waitForTransaction(sendedTx.hash)
// 回傳的資料
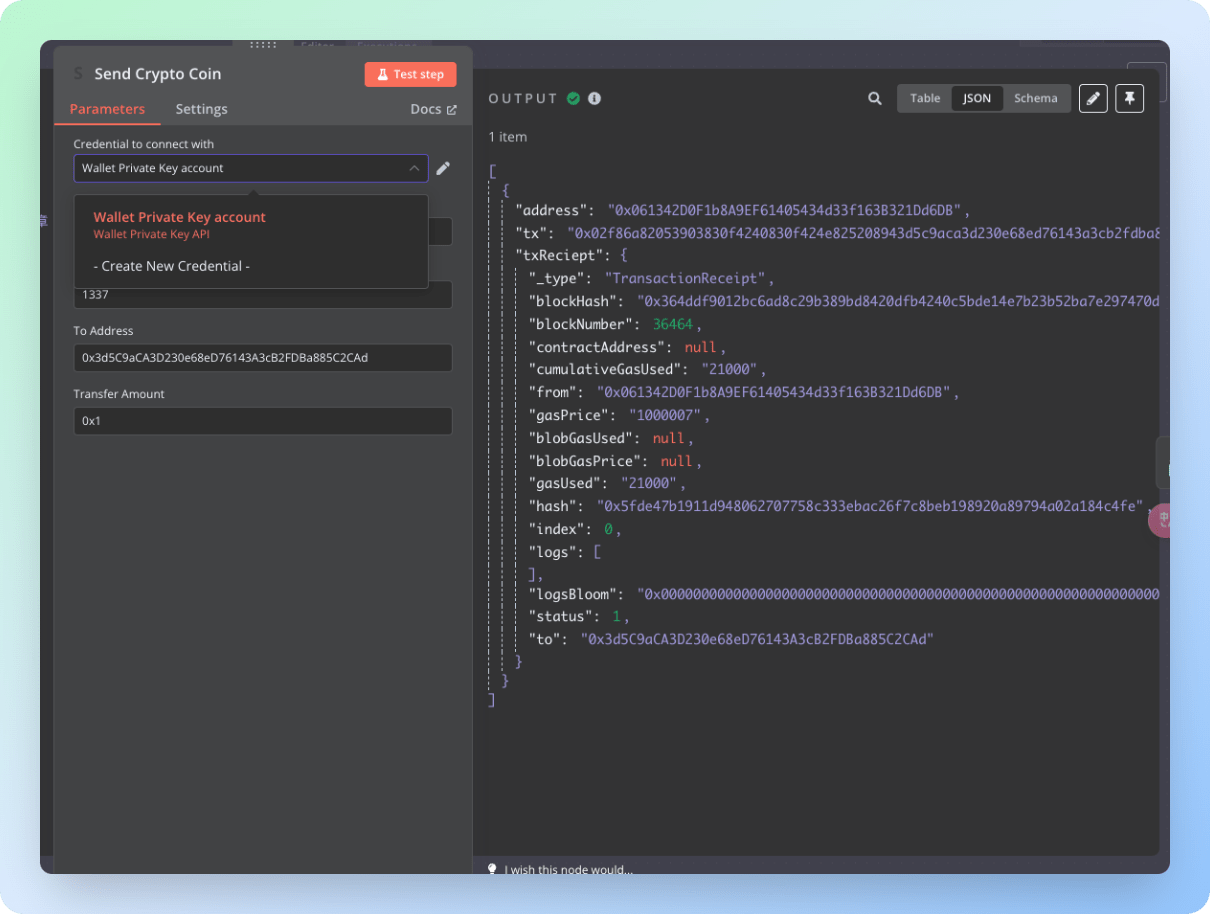
let item: INodeExecutionData = {
json: {
address: wallet.address,
txReciept: blockOutTxHash,
},
};
// 回傳資料
return [[item]];
}
}
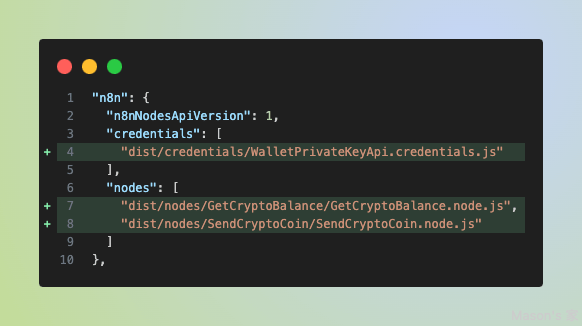
打包和修改 package.josn
現在做好了 credentials 和 nodes 但是還不能用,最後我們要做打包的動作,提供給 n8n 使用。
回到 n8n-nodes-starter 這層目錄,執行 npm run build,就會出現 dist 的目錄。
npm run build然後修改 package.json 告訴 n8n 要去哪個目錄找到 credentials 和 nodes。
你會在 package.json 裡面看到描述 credentials 和 nodes 路徑的文字,把它修改成 dist 裡面的檔案目錄。
這樣就大功告成了。
回到 n8n 執行節點吧~
別忘了要 Create New Credential 來放入私鑰
最後你可以把這客製化節點,上傳到 NPM 與所有人分享
請觀看: